Monday, July 19, 2010

Featured Treasury at ETSY!


Upcycled Treasury at ETSY

Marmi was recently featured in a treasury at Etsy. A treasury is a group of items chosen by another etsy artist. They featured one of my upcycled, wool-felted bags! Here's a link .....

I'm so excited!

FUN IN THE SUN


Family Summer Vacation 2010

We just returned from a wonderful family trip to the beach. We spent one whole week together at the beautiful beach at Emerald Isle, NC. This was our first time at this beach and I have to say WE LOVED IT! We will definitely be going back! The beach was pretty clean, it wasn't crowded, and the locals were super nice. We stayed at a beautiful house that was walking distance to the beach (only a couple minutes walk). This was the first time we've had a family vacation when one or all of us wasn't home sick by the third day.


Mary Grace LOVES the beach. If we would have taken our pets with us, she would have stayed there forever! This girl was a fish in a former life! We couldn't keep her out of the water. We have to constantly keep an eye on this one because she'll be out, over her head before you know it! NO FEAR!


This was Naomi's first visit to the ocean - and I think she liked it! Unlike her older sister, she wasn't overly thrilled about the water. Most of the time she wanted Mommy to sit in the chair so she could sit on my lap and watch the people walk by. She did play in the sand - some, and in the water - some! But mostly, she sat on my lap! (I have a very unusual tan)


Our friends, Bob & Maggie, and their girls, Lenita & Madelyn came down for the weekend. We had a great time with them and hated to see them leave on Sunday. The girls have so much fun playing together. I can see them getting into a lot of trouble together as they get older! And I owe Maggie BIG! I forgot to take my camera to the beach on the first day. So she took some wonderful photos of Naomi for me on her first day in the sand! XOXO!


Mary Grace. My little surfer girl!


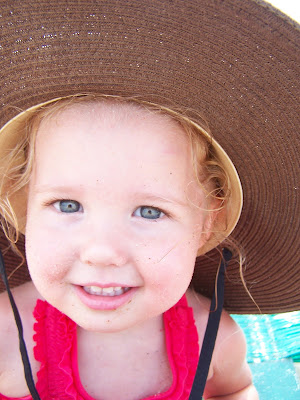
Naomi. Mama's girl at the beach!


We had a fantastic time! I can't wait to go back!

Friday, July 9, 2010

Fun Fourth


Family Fourth of July!


Our July Fourth lasted all weekend this year. Beginning with a cookout at my Aunt Mary's house on Saturday night. My Aunt Sue and Uncle Bill were visiting from Florida. And my Uncle John and Aunt Rosalie were in from Greenville, NC. I never appreciated having a large extended family when I was younger but now that I have children of my own, I really love getting together with everyone. And I really miss the ones who have passed and those who just couldn't make it.


We talk and eat! Then the girls always want to go swimming in Aunt Mary's pond. I was surprised that Naomi stayed in the water. She is not a big water lover. Mary Grace, on the other hand, is not afraid of anything! And she LOVES the water. We can't keep her out of it.


Sunday, we went to church as usual. I had children's church with the pre-schoolers, so we made many red, white & blue crafts. Then we took my mom and step-dad out to lunch for Mom's 60th birthday! Happy Birthday Mom!!!


Later that evening we were invited to the Kelly's for a cookout and fireworks. The food was awesome and the girls got to play with all their friends.


All in all, we had a very busy and exciting Fourth of July spent with wonderful family and friends.


Swimming in the pond


Mary Grace with her sparkler


Ashley with his!


Aunt Sue helping Naomi

Thomasville's Memorial Day Parade


Memorial Day Parade in Thomasville


I was surprised to know that Thomasville was the only place in North Carolina to have a Memorial Day parade! That makes me a little sad! :(

We decided to take the girls to the parade! We had a great time watching the soldiers marching by and all the old cars! Afterward, we took the girls to Holly Hill Cemetery to show them my grandfather's grave and Ashley's grandfather's. We explained to them about all the flags that were placed on the graves.

Here are some pictures of our day.... enjoy!

Many People Have Eaten My Cooking & Gone On To Lead Normal Lives

Faye's Chicken
YUMMY!!!!!!!!!


This recipe is the BEST! It's easy with few ingredients. It's great to serve when you have guests, take to a covered dish dinner, or take to someone who has been ill or just had a baby! I usually double the recipe and make two - one for dinner and one to freeze for another night.

Ingredients

(this has been doubled - it will make 2 pans!)

3-4 cooked chicken breasts

14.5 oz. box of angel hair pasta

2 lg. cans chicken broth

2 cans Rotel tomatoes, drained (I use mild because of the girls)

Parmesan cheese

16 oz container sour cream

2 cans of Cream of Chicken Soup


Cook chicken breasts in chicken broth, reserving the broth to cook the pasta in. Cut chicken into bite-sized pieces. Combine the chicken, tomatoes, sour cream, and soup in a large bowl. Stir the chicken mixture into the cooked pasta. Pour into a casserole dish and top with Parmesan cheese. Cover and bake at 350 until bubbly!

Serve with a crusty french bread and a nice summer salad!


By the way, Faye is a friend of my mother-in-law! THANKS FAYE!!! :)

Friday, June 25, 2010

Bandanna Dress Tutorial


I made some simple Bandanna Dresses for the girls. They were super easy to make, very inexpensive, and perfect for the Summer!

Materials needed:
2 Bandannas (at least 20" square - I got mine from Wal-mart, $1 each!!)
Matching Thread
Elastic (mine was 3/4")
Measuring Tape
Coordinating Fabric or Ribbon
Scissors
Safety Pins
Sewing Machine

Pin the two bandannas wrong sides together. This sounds easy, but it could be the most difficult part of the whole project because most of the time the bandannas are not the same size. So play around with it and fudge a little if needed. And yes, I said wrong sides together! I know that sounds backwards but ever since I learned to do "French Seams" I think I have to do them on everything! It makes for a nicer finish!

Sew down the two sides of the dress with a straight stitch, getting as close to the edge as possible! Don't forget to back stitch at the beginning and the end. That will reinforce your seams!

Iron the seams open. Then turn inside out and iron again. This will give you a smooth edge. Pin along down the inside of the seam you just sewed and ironed.

Then sew down the sides of the dress again (this time wrong side out). This will enclose your seam! NEAT!!!!

Now both sides of your dress should be completely sewn.

Next is the top! You want to sew a hem around the top of your dress that is 1/4"+ wider than your elastic. My elastic is 3/4" wide so my hem will be 1"+. That way my elastic will go in flat!

Sew all the way around the top of the dress, leaving a 2" to 3" opening to put in your elastic.

Take a chest measurement of your little one! Cut a piece of elastic 1 1/2" longer than your measurement. Attach a safety pin to the end of your elastic and thread it through the opening.

Once your have it all the way around, pin the two ends together securely with the safety pin. Then test it out on your little girl! Adjust as needed! This is also a good time to figure out where to put the straps, so go ahead and put safety pins where they should go in the front.

Securely sew the elastic together. I just sew forward and back making a zigzag! It doesn't have to be pretty - just secure! Now sew the opening closed and adjust the dress around the elastic.

Now for the straps and the loop! I used a 1 1/2" Grosgrain ribbon, but you could use a coordinating fabric to make the straps. Cut 3 1/2" to 4" piece of ribbon (burn the ends with a lighter so it won't fray) and make a loop. Sew to the inside, center of the back of the dress. I used a straight stitch (back stitching to reinforce) right across the elastic. Then stitched again just below (see photo above). For the straps, cut two pieces of ribbon (measure your child to see how long you need them - better too long than too short!). Burn the ends again. Sew the same way you did the loop, to the the inside front of the dress where you have marked with the safety pins.
Now you're DONE!!!!

ENJOY!!!

Many People Have Eaten My Cooking & Gone On To Lead Normal Lives


Fried Ravioli
This is one meal that the girls BOTH loved!

Ingredients:
Vegetable Oil for Frying
1 Large Egg
2 Tablespoons Milk
2/3 Cup Seasoned Bread Crumbs
24 Refrigerated Cheese Ravioli
1/4 Cup Grated Parmesan Cheese
2 Cups Jarred Marinara Sauce

Pour vegetable oil 1" deep into a pot or pan. Warm oil over medium-high heat. Line a baking sheet with parchment or foil, and line a plate with paper towels.

While oil is heating, whisk together the egg and milk in a bowl. Place bread crumbs in a separate bowl. Working in small batches, dip ravioli in egg mixture then coat with bread crumbs. Place coated ravioli on baking sheet.

Fry the ravioli in small batches as well. Fry until golden brown (3 minutes or so). Do not over crowd the pan. Put fried ravioli on paper towel lined plate to drain. Sprinkle with Parmesan Cheese and serve with warmed marinara sauce for dipping! YUMMY!!!!